
Views: 0 Author: Site Editor Publish Time: 2026-08-04 Origin: Site
Selecting the exact specification of a structural fastener might seem like a minor procurement detail on a busy job site. However, this choice directly controls the structural integrity and code compliance of your entire project. The risks of making an incorrect specification are severe and immediate. Choosing improperly sized hardware quickly leads to split lumber, compromised shear strength, and failed building inspections.
Furthermore, these avoidable errors waste valuable labor hours and expensive materials. They can cause severe project delays. This guide bypasses marketing fluff to deliver a rigorous, hard-spec evaluation framework. We will help you select the exact hardware needed based on load requirements, wood type, and environmental exposure. You will learn how to decode gauge specifications, compare fastener types, and navigate complex building codes with absolute confidence.
To buy hardware accurately, you must understand the penny system. Historically, this system denoted the price of 100 nails in 15th-century England. The letter "d" stands for denarius, a Roman coin. Today, the penny system serves as a strict dimensional standard across the construction industry. It translates directly to modern, measurable dimensions.
A rigid sizing rule governs this system. A linear relationship exists between the penny size, the Length of common nail, and the shank diameter. When you increase the penny size, the fastener grows longer. It also grows thicker. Scaling one dimension automatically scales the other. You cannot buy a highly specialized long fastener featuring a very thin shank under a standard common designation.
We advise buyers to establish a strict evaluation metric. You must verify both length and wire gauge. Examine manufacturer spec sheets carefully. Off-brand variations sometimes compromise shank thickness. Manufacturers do this to save on steel costs. A thinner gauge destroys the intended shear capacity. You must ensure the actual wire gauge matches the industry standard for that specific penny size.
Keep a standard calculation baseline in mind for field verification. A standard 2d designation equals 1 inch in length. Every subsequent penny size up to 10d adds exactly 1/4 inch. For example, a 3d size is 1.25 inches. A 4d size measures 1.5 inches. Knowing this baseline helps you audit deliveries quickly on the job site. You can spot incorrect shipments before they enter the framing process.
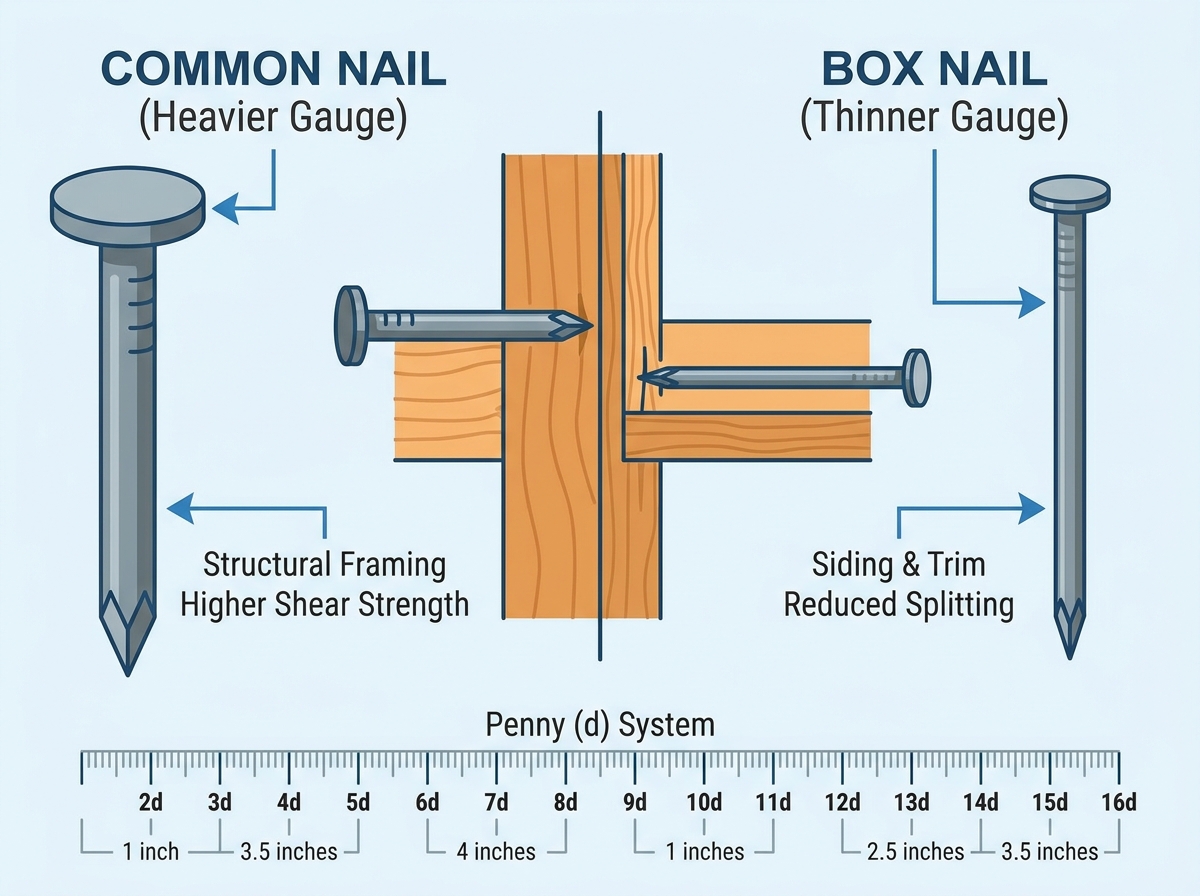
Framing a structure requires a deliberate choice between load capacity and material preservation. When you evaluate Common nails vs box nails, you must weigh maximum shear strength against the risk of wood damage. They look similar at a glance. However, they perform very differently under stress.
The standard Common Nail represents the heavyweight option. They feature a significantly thicker shank and a larger head. They offer massive holding power. Builders rely on them for structural framing tasks. They excel at joining 2x4s, building shear walls, and securing heavy-duty load-bearing connections.
However, this heavyweight profile carries a specific risk. The thick shank displaces a large volume of wood fiber upon impact. This creates a high probability of splitting thinner materials. Kiln-dried lumber and older, brittle wood species are particularly vulnerable to splitting.
Box nails serve as the lightweight alternative. They utilize a noticeably thinner shank. This design minimizes wood displacement. Box nails are best for installing siding, attaching shingles, and securing trim. They shine in applications where splitting presents a major concern. You use them when heavy structural hold is not the primary performance metric.
You can use a simple decision matrix for your projects:
Specifying the right size represents only half the battle. A perfectly sized fastener fails quickly if coated improperly. Premature oxidation destroys structural connections. Chemical failures degrade wood over time. You must match the metal coating to the exact environmental conditions of your project.
Uncoated options, often called "Bright" hardware, offer zero corrosion resistance. They consist of bare steel. You must specify them strictly for interior framing. Use them only where climate control keeps moisture levels low. If exposed to weather, bright steel rusts almost immediately.
Galvanized types require careful distinction. Many buyers confuse the different galvanizing processes.
Stainless steel represents the absolute premium evaluation standard. Certain environments demand it. Coastal properties subject hardware to aggressive salt spray. Cedar and redwood lumber bleed natural tannins. When tannins interact with iron, they create ugly black stains. Stainless steel prevents iron-stain formation entirely. It is a non-negotiable success criterion for premium decking and coastal framing.
You need actionable data to streamline your procurement process. Sorting through dozens of specifications causes delays. We organized standard Common nail sizes into practical categories. Use this data to map specifications directly to their designated applications.
Light-duty applications generally require sizes ranging from 2d to 6d. These measure between 1 inch and 2 inches. You use them for lath installation, light sheathing, and temporary bracing. They provide quick holding power without damaging thin materials.
Medium-duty applications rely heavily on 8d to 10d sizes. These measure between 2.5 inches and 3 inches. They represent the highest-volume procurement sizes on residential job sites. You need them for subflooring, standard wall framing, and scaffolding assembly. Toe-nailing studs typically requires an 8d specification.
Heavy-duty tasks demand sizes from 16d up to 60d. These measure from 3.5 inches up to 6 inches. You specify these for securing double top plates. They handle heavy timber connections. A 16d specification serves as the absolute standard for face-nailing 2x4 framing.
| Penny Size (d) | Length (Inches) | Typical Gauge | Primary Application Profile |
|---|---|---|---|
| 2d | 1.0" | 15 | Lath, temporary light bracing |
| 6d | 2.0" | 11.5 | Light sheathing, siding base |
| 8d | 2.5" | 10.25 | Subflooring, toe-nailing studs |
| 10d | 3.0" | 9 | Heavy framing, scaffolding |
| 16d | 3.5" | 8 | Face-nailing, double top plates |
| 40d | 5.0" | 4 | Heavy timber, landscape ties |
You must constantly check your embedment depth assumptions. Required embedment depths dictate the necessary length. Industry best practices recommend embedding the fastener 2 to 3 times the thickness of the attached material. If you attach a 1-inch board, you need 2 inches of penetration into the base material. Therefore, you must procure a 3-inch overall length.
Securing the correct physical dimensions is only the first step. You must manage implementation risks effectively. Local building codes rigidly dictate project requirements. The International Building Code (IBC) and International Residential Code (IRC) define exact fastening schedules. They specify exactly how many fasteners go into a shear wall. They specify the exact spacing intervals.
Failing to specify the correct hardware voids your compliance. An inspector will check the fastener heads. If a schedule requires a specific 10d or 16d spacing, substituting a smaller gauge fails the inspection. You will have to tear out the work and rebuild it.
Furthermore, you must align your bulk procurement with your job site tooling. Pneumatic framing nailers dominate modern construction. They require collated strips of fasteners. These strips come in specific angles, typically 21°, 28°, or 30°. You must ensure the collated "equivalent" meets the exact same shank diameter as the hand-driven specification. Some collated brands use thinner wire to fit more pieces per strip. Inspectors actively look for this discrepancy.
You also face bulk estimating realities. Suppliers sell these fasteners by the pound. A larger penny size means fewer pieces per pound. You must calculate yield accurately based on your fastener schedule requirements.
Job-site shortages halt production. Estimating yield prevents costly downtime. It ensures your framing crews never wait for hardware deliveries.
Sourcing the right hardware is a rigorous exercise. You must actively match structural load requirements, material compatibility, and environmental risks. Ignoring any of these factors compromises your entire build. You now understand how the penny system dictates dimensions and why gauge thickness matters for shear strength. You also know exactly when to upgrade to Hot-Dipped Galvanized or Stainless Steel to prevent chemical corrosion.
Take immediate action on your next project. Cross-reference your structural blueprints against local building codes. Finalize your required penny size and coating type based on those documents. Request detailed technical spec sheets from your suppliers before placing bulk orders. Verify the wire gauge matches your load calculations exactly.
A: A standard 16d specification measures exactly 3.5 inches in length. Builders consider this the universal standard for connecting 2-inch nominal lumber, such as face-nailing two 2x4s together during wall framing.
A: You can only use one if it features a Hot-Dipped Galvanized (HDG) or Stainless Steel coating. Pressure-treated wood contains high levels of copper azole or ACQ. Uncoated bright steel will corrode rapidly and fail structurally.
A: The name reflects their historical status as the universal standard for rough carpentry. They feature a thick shank and wide head, making them the most commonly used, reliable fastener for heavy structural framing across the industry.
A: Yield depends entirely on the specific penny size and wire gauge. A larger size yields fewer pieces per pound. For example, you typically get about 69 pieces per pound for a 10d size, versus roughly 47 pieces for a 16d size.


