
Views: 0 Author: Site Editor Publish Time: 2026-08-05 Origin: Site
Selecting the wrong fastener compromises structural integrity instantly. In framing and load-bearing applications, this mistake often causes catastrophic failures over time. The difference between an adequate fastener and the correct one dictates project longevity. It also ensures strict building code compliance. We consider the Common Nail as the heavy-duty standard for rough carpentry. You can easily distinguish it from finishing or light-duty alternatives by its robust design. This article equips buyers, contractors, and DIYers with an evidence-based framework. You will evaluate these essential fasteners based on shank thickness, shear capacity, sizing rules, and environmental resistance. We will demystify the penny system and explore material durability. Ultimately, you will know exactly how to specify the right hardware for your next heavy-duty build.
Engineers design structural fasteners to handle immense stress. They prioritize holding power over aesthetic appeal. The anatomy of these heavy-duty fasteners reflects this engineering philosophy. Every physical characteristic serves a distinct structural purpose.
First, consider the thick shank. A heavy wire gauge maximizes shear capacity. Shear capacity measures resistance to sideways pressure. When houses settle or winds blow, walls experience lateral forces. The thick steel core prevents the fastener from snapping under these loads. Framing and structural joining rely heavily on this resistance.
Next, examine the flat, wide head. Heavy loads often pull structural members apart. The expansive surface area of the head provides critical holding power. It prevents the fastener from pulling through the wood fiber. You need this feature when securing floor joists or assembling trusses.
Finally, inspect the diamond point. Manufacturers shape this standard tip for fast, efficient driving. The sharp point easily wedges wood fibers apart. This speeds up the framing process significantly. However, it carries a higher risk of splitting dense wood. You must balance speed with material integrity during installation.
Building codes heavily regulate structural connections. Organizations like the International Code Council (ICC) specify these robust fasteners for shear walls, floor joists, and structural headers. Inspectors look for them because they offer verifiable load ratings. Unlike lighter alternatives, they guarantee the assembly meets minimum structural safety standards.
Understanding fastener dimensions requires a quick look at history. The construction industry uses the "penny" system, denoted by the letter "d". Originating in 15th-century England, the term originally referenced the price for one hundred fasteners. Today, it serves as a reliable indicator of both length and wire gauge. As the penny number increases, the fastener grows longer and thicker.
Navigating Common nail sizes prevents costly framing errors. Using an undersized fastener weakens the joint. Using an oversized one destroys the lumber. You must map the specific size to its intended outcome.
Industry standards dictate specific sizes for specific tasks. An 8d fastener measures 2 ½ inches long. Framers use it as the industry standard for fastening 2x4 framing lumber. The 10d and 12d variants measure 3 to 3 ¼ inches. Builders use these for heavier framing tasks. They work perfectly when joining doubled nominal lumber. The massive 16d variant measures 3 ½ inches long. It remains absolutely essential for structural framing and heavy timber connections.
Below is a standardized sizing reference guide.
| Penny Size (d) | Length (Inches) | Wire Gauge | Primary Application |
|---|---|---|---|
| 6d | 2" | 11.5 | Light framing, blocking |
| 8d | 2 ½" | 10.25 | Standard 2x4 framing |
| 10d | 3" | 9 | Heavy framing, toe-nailing |
| 12d | 3 ¼" | 9 | Doubled lumber connections |
| 16d | 3 ½" | 8 | Heavy timber, structural joining |
Determining the correct Length of common nail requires basic math. Follow a proven rule of thumb. The fastener should be 2.5 to 3 times longer than the thickness of the material you are attaching. This formula ensures adequate penetration into the base material. For example, if you attach a ½-inch piece of plywood, you need a fastener at least 1 ½ inches long. This guarantees optimal holding power and structural stability.
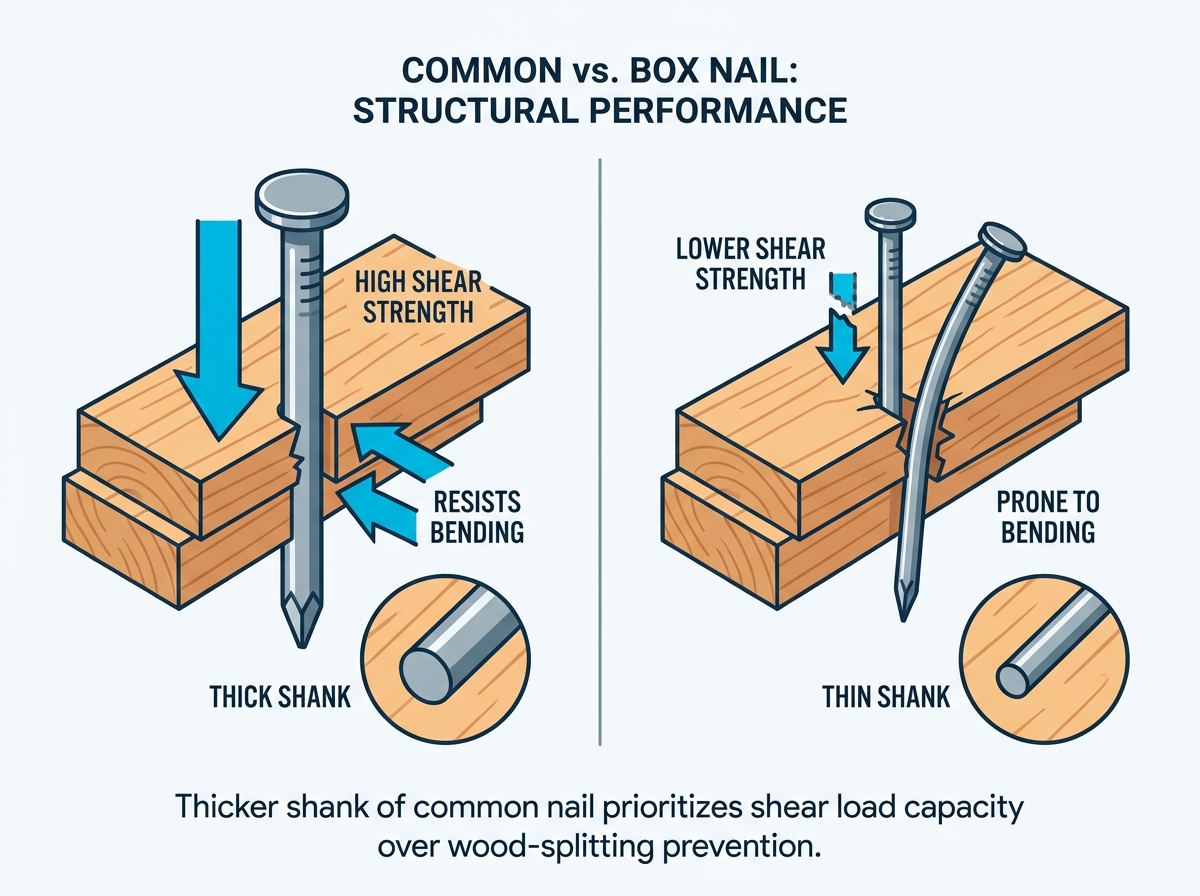
Builders frequently face a choice between two similar-looking fasteners. Deciding between Common nails vs box nails confuses many beginners. However, professionals know they serve entirely different structural purposes. You must evaluate their head-to-head performance across three key metrics.
First, evaluate shank diameter. The structural standard is significantly thicker than the box variant of the same penny size. This extra steel adds substantial mass. Second, consider shear strength. The thicker option resists bending and shear forces exceptionally well. Box alternatives bend easily under heavy loads. They cannot support structural weight. Third, analyze wood splitting risk. Box variants easily penetrate thinner, drier woods without splitting them. Their thinner profile displaces less wood fiber. Conversely, thick structural fasteners require careful placement. You often need to pre-drill them near board edges to prevent severe splitting.
We created a comparison chart to simplify your selection process.
| Feature | Common Fasteners | Box Fasteners |
|---|---|---|
| Shank Profile | Thick, heavy-gauge steel | Thin, lighter-gauge steel |
| Shear Capacity | High (resists sideways force) | Low (prone to bending) |
| Splitting Risk | High (displaces more fiber) | Low (gentle on thin wood) |
| Best For | Load-bearing walls, framing | Siding, trim, thin panels |
Use a clear decision framework for your projects. Choose the heavy-duty option for structural framing, deck framing, load-bearing walls, and heavy scaffolding. You rely on them when safety and shear strength matter most. Conversely, choose the lighter box variant for siding, trim, and attaching thinner wood panels. Use them when working with splitting-prone lumber. They shine when structural shear strength is not your primary factor.
Steel rusts when exposed to moisture and oxygen. To combat this, manufacturers offer various material compositions and coatings. Choosing the right coating determines the lifespan of your project. You must match the fastener's durability to its operating environment.
We categorize environmental solutions into four distinct tiers:
Risk mitigation goes beyond selecting the right coating. You must avoid mixing incompatible fasteners and metal connectors. For example, never use galvanized fasteners with stainless steel joist hangers. When two different metals touch in the presence of moisture, galvanic corrosion accelerates. The weaker metal sacrifices itself and deteriorates quickly. Always match your fastener material exactly to your hardware material.
Even the highest-quality fasteners fail if installed improperly. Thick shanks displace significant amounts of wood fiber. This naturally increases the risk of splitting the lumber. Splitting destroys the joint's holding power. Professionals employ specific techniques to overcome these implementation realities.
Master these proven driving techniques to protect your lumber:
Attention to detail during installation separates amateur work from professional craftsmanship. Always inspect your lumber's grain direction. Adjust your driving angle if you notice micro-fractures forming. These small adjustments ensure the structural framework remains rock solid for decades.
Planning your procurement prevents job site delays. Project sizing and scalability dictate how you buy materials. You must estimate quantities accurately before breaking ground.
To estimate quantities, professionals calculate pounds needed per square foot of framing. A standard rule suggests you need roughly 30 pounds of fasteners for every 1,000 square feet of rough framing. Evaluate your procurement methods based on this scale. Buying in bulk (such as 30-pound or 50-pound buckets) suits large additions or new builds. Purchasing smaller retail boxes makes sense for weekend DIY projects or minor repairs. Keep different sizes segregated in your tool belt to maintain efficiency.
Your final verification step involves regulatory compliance. Never guess which size to use on critical connections. Consult local building codes to ensure your choices meet the minimum fastening schedule requirements. Code books dictate the exact gauge, length, and quantity required for specific structural assemblies. For instance, attaching a rafter to a top plate requires a precise nailing schedule. Verifying these details before you build prevents costly teardowns during municipal inspections.
The success of any rough carpentry project hinges on fastener selection. The heavy-duty structural design discussed here remains the uncompromising choice for maximum shear strength. You simply cannot substitute lighter alternatives in load-bearing walls or floor joists without risking catastrophic failure.
Your final purchasing logic should follow a strict sequence. First, match the penny size exactly to the lumber thickness to guarantee adequate penetration. Second, select the appropriate protective coating based on exterior weather exposure and lumber chemical treatments. Finally, defer to thinner alternatives only when the risk of splitting delicate wood outweighs the need for maximum structural holding power. By adhering to these standards, you ensure your next building project is safe, compliant, and built to last.
A: A 16d fastener measures exactly 3 ½ inches long. Builders explicitly rely on this size for standard 2x framing. It easily penetrates two pieces of nominal two-inch lumber (which actually measure 1 ½ inches each), providing the essential half-inch of anchoring depth required for heavy timber connections.
A: Yes, you can use them, provided they possess the correct protective coating. You must select hot-dipped galvanized or stainless steel variants. Bare steel or electro-galvanized coatings will quickly rust. Treated lumber contains highly corrosive copper chemicals that rapidly destroy unprotected metal through galvanic corrosion.
A: The name stems from its historical status as the most mass-produced, universally utilized structural fastener. Before modern engineering diversified hardware into highly specialized niches, this basic, thick-shanked design was the default, "common" choice for nearly all rough carpentry and standard framing tasks.
A: No. They are entirely unsuited for roofing applications. Securing asphalt shingles requires specialized roofing fasteners featuring much broader, flatter heads. A broad head holds the fragile shingle material down firmly without tearing through it during high winds or temperature fluctuations.


