
Views: 0 Author: Site Editor Publish Time: 2026-08-07 Origin: Site
Fastening materials to concrete requires overcoming extreme base material hardness. You must also ensure long-term structural integrity. Using the wrong fastener leads to severe consequences. It often causes localized spalling, sudden pull-out failures, or deeply compromised structural safety. A poorly chosen fastener can ruin expensive materials and create dangerous hazards.
This guide breaks down the core evaluation criteria for selecting a Concrete Nail. We analyze decisions based on your drive method, specific load requirements, material thickness, and expected environmental exposure. Professionals need a reliable, evidence-based selection framework. Contractors, builders, and users undertaking serious structural or Concrete nails home improvement projects will discover exactly how to match fasteners to their exact application. You will learn how to secure materials safely and permanently.
You must define specific success criteria before evaluating fastener options. Ask yourself what matters most for the current job. Is the primary goal rapid installation across a massive floorplan? Do you need maximum shear strength to support heavy structural loads? Perhaps you want minimal concrete disruption to preserve an older foundation. Clarifying the project problem upfront prevents costly rework later.
The material you attach dictates how the fastener behaves under stress. Wood-to-concrete applications represent the most common scenario. Securing sill plates or furring strips requires fasteners capable of gripping wood fibers tightly while penetrating the hard base. Metal-to-concrete applications present different challenges. Securing steel track frames or heavy-duty brackets demands fasteners resisting high shear forces. Metal fixtures offer zero compression, meaning the fastener head absorbs immense impact energy directly.
Concrete characteristics change drastically over time. You must differentiate between green concrete and old, fully cured concrete. Builders pour green concrete recently. It retains moisture and cures actively. Fasteners penetrate green concrete much easier, requiring less impact force. Old concrete typically cures fully after 28 days. It becomes exceptionally hard and brittle. Fastening into older slabs requires higher impact force. You often need specific shank designs to prevent severe surface cracking or complete fastener deflection.
Project scale heavily influences tool and fastener selection. High-volume commercial builds demand efficiency. They rely on automated systems and bulk collation formats. A specialized residential retrofit might involve only a few dozen fasteners. Such limited scope rarely justifies expensive automated tooling. Evaluate your expected daily volume. This assessment helps determine whether you should invest in specialized tool platforms or stick to traditional hand-driven methods.
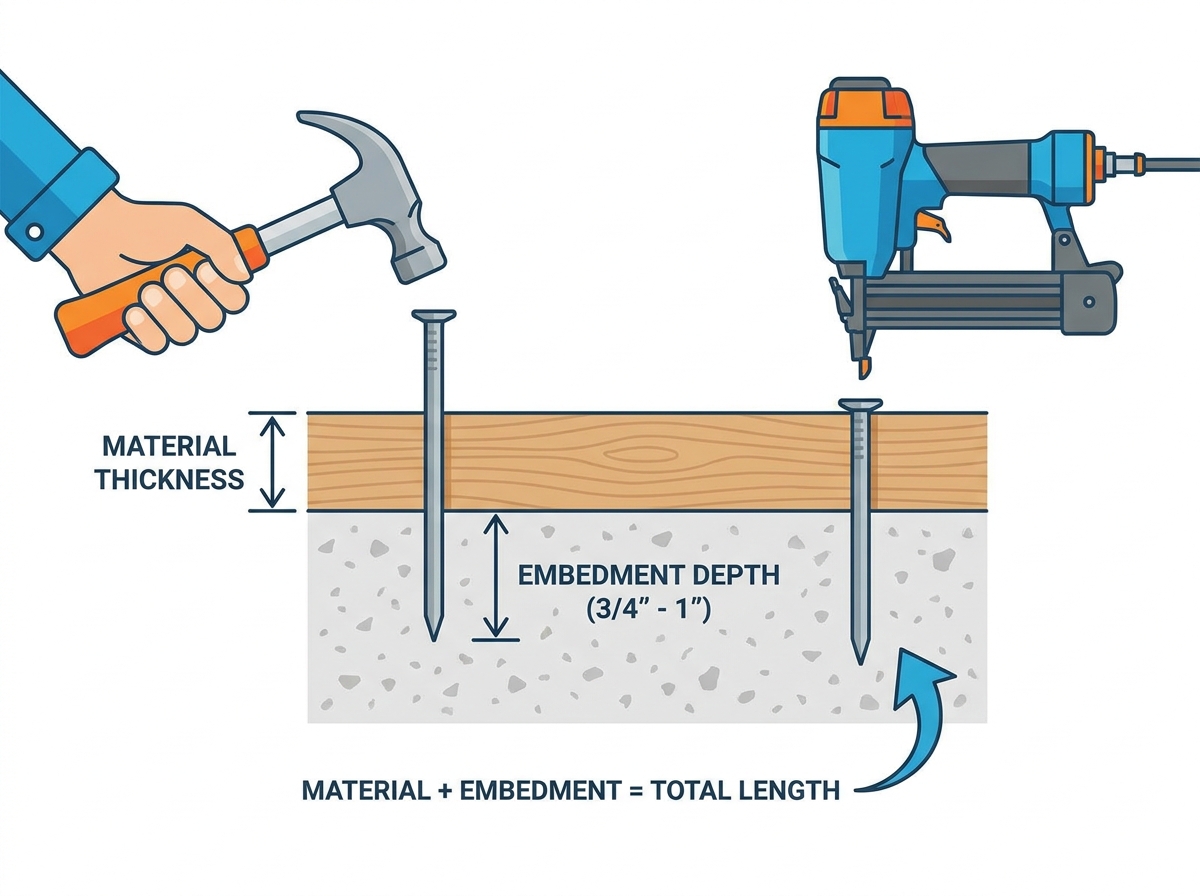
Selecting your drive method balances project volume against available equipment. Both manual and automated methods have strict operational boundaries.
Hand-driven masonry nails serve specific, focused needs well. They remain the best option for low-volume tasks. They also excel in tight spaces lacking room for bulky power tools. Budget-restricted single tasks benefit heavily from this inexpensive approach.
You typically choose between two main types. Cut masonry nails feature a distinct wedge shape. This blunt design shatters the concrete slightly upon entry, reducing massive spalling risks. Fluted shank nails use longitudinal grooves. These grooves help the fastener track straight into dense material. However, hand-driving carries significant trade-offs. You will experience high physical fatigue rapidly. The risk of human error increases substantially. Striking the head off-center often results in bent nails and ruined concrete patches.
Automated systems revolutionize commercial applications. High-volume framing and commercial jobs rely entirely on automated fastening. They provide unmatched speed and consistent depth control. A dedicated Concrete nail gun drives fasteners cleanly into fully cured slabs in milliseconds.
Tooling integration requires a careful return-on-investment evaluation. A specialized tool requires maintenance, specialized fuel or powder loads, and specific safety training. You must also know how to specify the right Concrete nails for nail gun systems. Manufacturers produce these fasteners in various collations. Plastic collated strips resist moisture well on outdoor sites. Paper tape strips create less job site debris. Specialized pin types, like T-nails, secure specialized metal tracks flawlessly. Always consult your tool manual. Using incompatible collated strips causes dangerous jams and internal tool damage.
Incorrect sizing guarantees structural failure. You must calculate length precisely and evaluate gauge thickness based on expected loads.
Industry standards rely on a strict mathematical formula. Embedment depth dictates the holding power entirely. Standard practice requires 3/4 inch to 1 inch of penetration directly into the concrete base. This rule remains absolute, regardless of the attached material's thickness.
Follow this numbered checklist to determine your required length:
For example, fastening a standard 1.5-inch thick lumber plate requires a fastener exactly 2.25 to 2.5 inches long.
Fastener diameter heavily influences performance. Thicker gauges offer significantly higher shear strength. They resist lateral forces attempting to slide the attached material. However, thicker pins displace more substrate. This displacement increases the risk of substrate cracking, especially near edges. Using heavy-duty Concrete nails for framing applications securely locks 2x4 bottom plates into foundation slabs. Conversely, you should use lighter gauges for fastening thin plywood or delicate trim pieces. Lighter gauges minimize surface disruption.
The shank design determines how the fastener interacts physically with the dense base material. Different profiles suit different structural demands.
| Shank Profile | Drive Difficulty | Pull-Out Resistance | Ideal Application |
|---|---|---|---|
| Smooth | Low | Low | Light trim, temporary holds |
| Fluted | Medium | Medium-High | Standard framing, sill plates |
| Spiral / Twisted | High | Maximum | Heavy loads, high vibration areas |
Environmental exposure dictates your material choice. Ignoring ambient moisture levels leads to rapid oxidation, structural failure, and dangerous degradation.
Climate-controlled environments present minimal corrosion risks. You can safely utilize bright, uncoated steel fasteners here. Standard Electro-Galvanized steel also works perfectly. Electro-galvanizing applies a very thin layer of zinc via electrical currents. This light coating proves sufficient for enclosed, dry wall framing. It keeps costs manageable while preventing minor surface rust during transit and installation.
Outdoor projects face relentless environmental attacks. Rain, snow, and soil moisture destroy uncoated steel quickly. You must upgrade to Hot-Dipped Galvanized options. This process submerges the steel into molten zinc. It creates a robust, thick sacrificial layer capable of withstanding harsh weather exposure for decades.
Marine environments or industrial plants present extreme chemical exposure. Stainless steel remains the definitive choice for these scenarios. While offering the highest upfront price, stainless steel completely eliminates oxidation risks. It provides structural peace of mind in the most punishing conditions.
Modern fastener engineering goes beyond simple rust prevention. Manufacturers apply specialized friction-altering coatings to enhance installation. Vinyl-coated options represent a massive leap in fastening technology. The extreme friction generated during the high-speed drive causes the vinyl to melt temporarily. It acts as a liquid lubricant initially, allowing easier penetration. Seconds later, the vinyl cools and cures. It transforms into a strong adhesive, locking the fastener permanently into the porous substrate.
Never use untreated steel fasteners with pressure-treated lumber. The copper-based chemicals in modern treated wood will eat through standard steel rapidly. Always specify hot-dipped galvanized or stainless steel when securing treated sill plates.
Even perfectly selected fasteners fail if installed poorly. You must manage specific implementation risks actively to ensure structural integrity.
Driving fasteners displaces dense material violently. Fastening too close to a slab edge causes the substrate to fracture and blow out sideways. Industry guidelines mandate a strict distance rule. You must avoid fastening closer than 3 inches to any unsupported edge. If you must fasten near an edge, you must pre-drill pilot holes and use alternative masonry screws instead.
Automated tools require precise power adjustments. Over-driving represents a frequent, dangerous error. Excessive force crushes wooden sill plates, compromising their structural value. It can also shatter the fastener head entirely. Conversely, under-driving leaves the pin protruding. This results in loose, unsafe fixtures. You must always perform a test fire on scrap material. Adjust the pneumatic pressure or select a different powder load color before addressing the final workpiece.
High-velocity fastening poses severe physical risks. OSHA mandates specific protocols for powder-actuated tools. Operators often require formal licensing or manufacturer certification before using these devices on commercial sites. Standard PPE remains non-negotiable. You must wear impact-resistant eye protection and heavy-duty ear protection during all high-velocity fastening tasks. Shattered concrete fragments act like shrapnel, and the decibel levels of automated tools cause permanent hearing damage.
Selecting the correct fastener requires discipline and strict adherence to structural principles. You should base your final decision on a rigid order of operations. First, measure the required length based on the exact material thickness and the golden embedment rule. Second, choose your coating based strictly on anticipated moisture exposure. Finally, select your drive method based on the project volume and available equipment.
Your next steps involve careful preparation. Review your automated tool's exact collation specifications before purchasing bulk supplies. Audit your job site for required safety compliance and PPE availability. By respecting the substrate and matching the fastener properly, you guarantee a safe, permanent structural connection.
A: No. Standard wood nails completely lack the specialized carbon steel hardening required. If struck into dense masonry, they will bend immediately or shatter dangerously upon impact. You must always use specifically engineered hardened pins.
A: T-nails feature a distinct T-shaped head designed specifically for specialized pneumatic nailers. Professionals often use them in wood-to-concrete applications. The wider head prevents pull-through in soft woods while maintaining a clean, flush finish.
A: Pry bars usually cause severe concrete damage. The most evidence-backed method is to attach locking pliers firmly to the head. Twist the pin back and forth repeatedly to break the friction seal. If removal remains impossible, cut the head off flush using an angle grinder.


