
Views: 0 Author: Site Editor Publish Time: 2026-08-11 Origin: Site
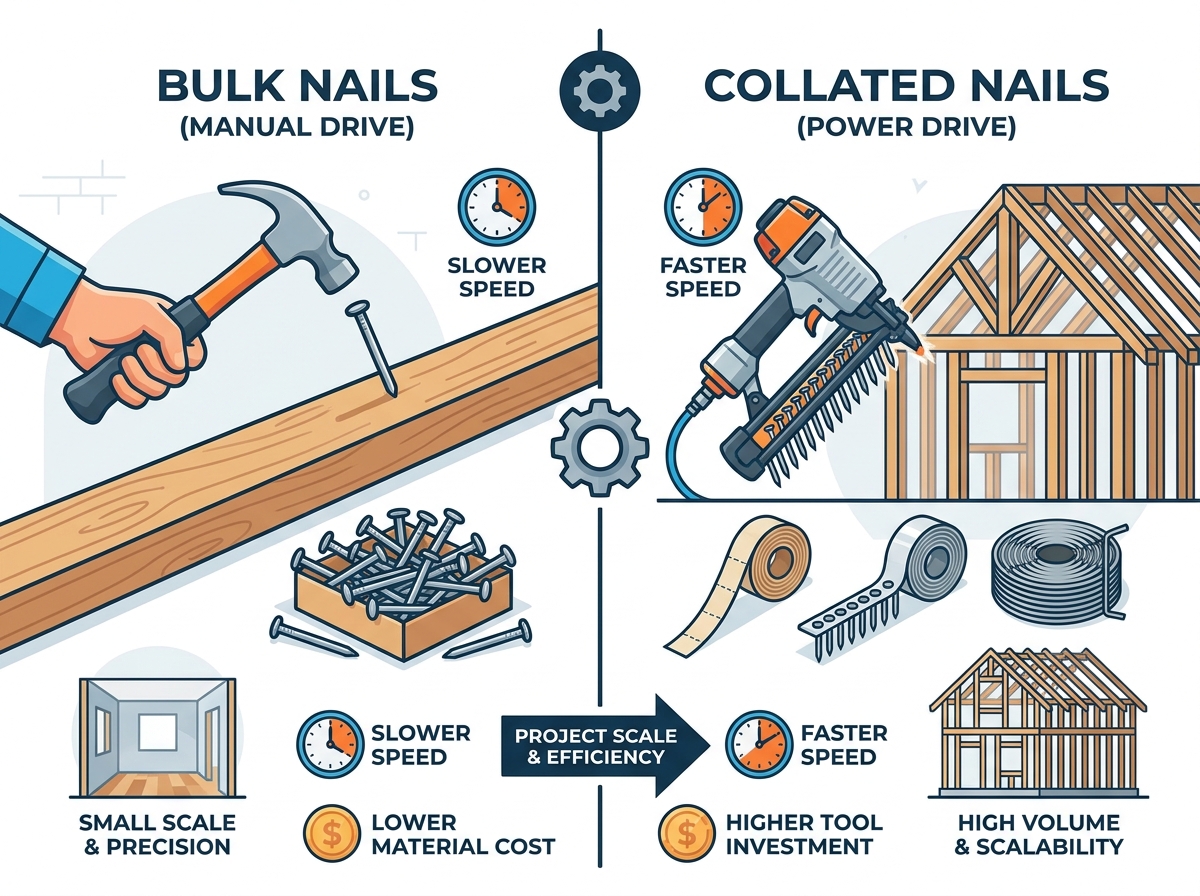
Builders often confuse general fastener categories on the active job site. The term "framing nails" describes robust fasteners built exclusively for structural wood construction. The word "collated" refers specifically to how manufacturers package them for pneumatic power tools. We see a major industry shift from manual bulk driving to automated collated nailers today. You must choose wisely to balance project speed, labor hours, and tool investment.
Picking the wrong format easily halts your job entirely and frustrates your crew. Proper fastener selection prevents costly callbacks. Quality construction relies entirely on this fundamental choice. Hand nailing takes a physical toll, while pneumatic tools offer speed at a premium.
This article provides an evidence-based breakdown of fastener types. You will explore dimensions, collation materials, and strict code compliance rules. We help you finalize purchasing decisions based on your specific structural requirements and existing tool compatibility.
Buyers frequently purchase the wrong fastener format. This mistake leads directly to frustrating workflow delays. Incompatible hardware ruins productivity schedules completely. We must clearly define the baseline between hand-driven and tool-driven options.
Hardware stores sell bulk nails loose by the pound or in large boxes. They remain highly cost-effective for targeted, low-volume tasks. They are ideal Framing nails for hammer use in tight corners. You might need them for small renovations or minor wall repairs. Joist hanger installations often require manual driving. Sometimes specialized metal connector nailers remain unavailable on site. They also work perfectly when dragging a heavy air compressor proves highly inefficient.
Manual driving requires absolutely zero setup time. It offers unmatched precision for delicate framing adjustments.
Manufacturers hold collated options together in precise strips or tight coils. Engineers design them strictly for pneumatic, gas, or battery-powered nailers. You cannot drive these efficiently by hand. They build these strips for massive scalability and rapid installation. This automated format significantly reduces labor hours on full residential builds.
A skilled carpenter can drive hundreds of fasteners per hour. This speed easily offsets the higher initial material cost. Professional crews rely entirely on collated options for primary structural assembly.
Common Mistake: Many beginners try substituting lighter brad or finish equipment for structural tasks. You must never do this. Structural frames carry immense load weights. You need heavy-duty shanks designed specifically for load-bearing walls.
Structural integrity always supersedes raw speed. You must follow standard International Building Code (IBC) and International Residential Code (IRC) regulations carefully. Building inspectors scrutinize fastener choices during rough inspections.
Let us debate clipped versus full round heads.
You must also evaluate the protective finish. Bright finishes lack corrosion resistance entirely. Use them for interior applications only. Galvanized coatings protect against rust. They are mandatory for exterior projects and treated lumber. Vinyl-coated options drive much easier due to reduced friction. The vinyl melts slightly during driving, forming a strong adhesive bond. Together, these precise details form the core Framing nails specifications you need to verify before purchase.
Best Practice: Always consult your structural engineer's notes on the blueprint. Modern pressure-treated lumber contains highly corrosive copper compounds. If you use standard bright finishes here, the chemicals will eat through the metal rapidly.
Selecting the correct length and gauge ensures structural safety. You want to avoid over-penetrating the material. You also want to prevent splitting the delicate wood fibers. Proper sizing guarantees maximum shear strength.
The hardware industry still uses historical penny sizes. We often translate these archaic measurements into modern inch lengths. The "d" originally stood for denarius, an ancient Roman coin. Today, it simply denotes length. For example, 16d equals exactly 3.5 inches. 10d equals 3 inches. 8d measures exactly 2.5 inches. Understanding this shorthand helps you navigate older blueprints easily.
Let us visualize a standard wall assembly. When you drive a 16d fastener through a double top plate, it passes through 3 inches of solid lumber. It needs that final half-inch to anchor deeply into the vertical stud below. If you mistakenly use a shorter 10d, you lose critical structural anchoring.
We must emphasize an important safety rule. The Framing nails size must match the lumber thickness perfectly. It must also fit your nailer's specified capacity range. Loading a 3.5-inch fastener into a gun rated only for 3 inches causes dangerous jams. Check your tool manual before purchasing bulk supplies.
If you commit to a nail gun, evaluate the collation material carefully. This choice proves critical for daily job-site efficiency. It also impacts how your tools handle harsh environmental conditions.
The paper tape holds fasteners tightly together using heavy-duty paper and glue.
Common Mistake: Leaving paper-collated boxes open in the back of a pickup truck overnight is risky. Morning dew provides enough moisture to swell the paper. Swollen tape jams the firing pin aggressively.
Manufacturers use rigid plastic to space the fasteners evenly.
Thin metal wires weld the fasteners into straight strips or large round coils.
We need to outline your final shortlisting logic. You should finalize purchases based on existing assets. Budget constraints also play a major role in your decision.
You simply cannot mix angles. A 21-degree nailer only accepts 21-degree plastic-collated strips. A 30-degree tool requires 30-degree paper tape. Check the tool magazine specifications carefully before buying bulk boxes. Forcing the wrong angle destroys the internal firing mechanism.
Compare the basic per-fastener cost of loose options versus collated premiums. Loose fasteners always cost less upfront. However, you must factor in the labor-cost offset carefully. The sheer speed of collated systems pays for the premium quickly. This holds true on projects larger than a single-room partition. You save hundreds of hours on a full residential frame.
Tool Audit Checklist:
Fastener Collation Comparison Chart
| Collation Material | Typical Angle | Weather Resistance | Job-Site Litter |
|---|---|---|---|
| Paper Tape | 30° - 34° | Low | None |
| Plastic Strip | 20° - 22° | High | High |
| Wire Weld | 28° or 15° | Very High | Low |
Audit your current tool inventory today. Check the brand, angle degree, and maximum length capacity. Verify your local building codes regarding head shapes. Complete these steps before ordering anything.
The choice between loose bulk options and collated strips depends entirely on project scale. It also relies heavily on tool availability and local code restrictions. You must align your purchasing strategy with your specific job-site realities.
Keep a small box of loose galvanized fasteners handy for tight-spot manual driving. Rely on the appropriate degree of collated strips for bulk structural assembly. Browse specific category pages today to find your exact match. You can shop for 21-Degree Plastic Collated strips or consult a fastener specialist for high-volume commercial orders.
A: No. Nails must match the exact angle (e.g., 21°, 28°, 30°) and collation type accepted by your specific nailer model. Forcing a mismatched angle causes severe jams and internal tool damage. Always verify your magazine specifications first.
A: 16d (3.5-inch) nails are the industry standard for joining 2x4 framing members. They provide the necessary penetration depth to secure wall plates to vertical studs safely without compromising structural integrity.
A: While they offer excellent sheer strength, their pull-through resistance is slightly lower. This happens because they have less surface area gripping the wood. This is exactly why many coastal or high-wind jurisdictions mandate full round heads for structural framing.
A: Yes, you can manually snap a nail from the plastic or paper strip and drive it with a hammer. However, removing the sticky collation residue from the shank can be tedious. It also makes manual driving slightly more difficult.


