
Views: 0 Author: Site Editor Publish Time: 2026-08-09 Origin: Site
Fastening wood or metal to masonry demands extreme precision to maintain structural integrity. It requires specialized hardware designed to pierce rigid substrates without shattering them. Using an incorrect fastener often leads to catastrophic project failures. You risk severe substrate spalling, inadequate shear strength, and hardware snapping under heavy loads. A weak connection jeopardizes the entire assembly. This leads to costly reworks and dangerous safety hazards on the job site. Whether you tackle a commercial build or residential upgrades, understanding these specifications is crucial.
We will provide a transparent, specification-driven framework for choosing the right hardware. You will learn how to evaluate base materials accurately. We will help you select appropriate installation tools and match environmental exposure requirements correctly. This guide ensures your next masonry task remains secure, structurally sound, and compliant with modern industry standards. You can proceed confidently once you master these core fastening principles.
Masonry substrates vary wildly in density and composition. Poured concrete acts very differently than concrete block (CMU), solid brick, or mortar joints. Poured walls offer extreme density and high holding power. CMU blocks provide hollow cavities and thin, fragile webs. Brick presents a softer but highly brittle surface prone to cracking. Mortar joints offer the least penetration resistance but provide minimal structural holding power. You must evaluate the exact material before driving any fastener.
Age and compressive strength (PSI) dictate fastener performance heavily. Green concrete cures for less than 28 days. It accepts a Concrete Nail much more easily. Fully cured concrete exceeding 4,000 PSI acts like solid rock. High PSI increases penetration resistance exponentially. Fasteners driven into older, hardened slabs require significantly more force. They also face a higher risk of bending during installation.
Understanding failure modes prevents dangerous accidents. Standard framing nails bend or snap immediately when driven into masonry. They lack the high-carbon steel required for substrate penetration. Hardened masonry fasteners handle shear loads exceptionally well. Shear load represents the downward force parallel to the wall. However, they struggle significantly under tension loads. Tension is the pull-out force acting perpendicular to the wall.
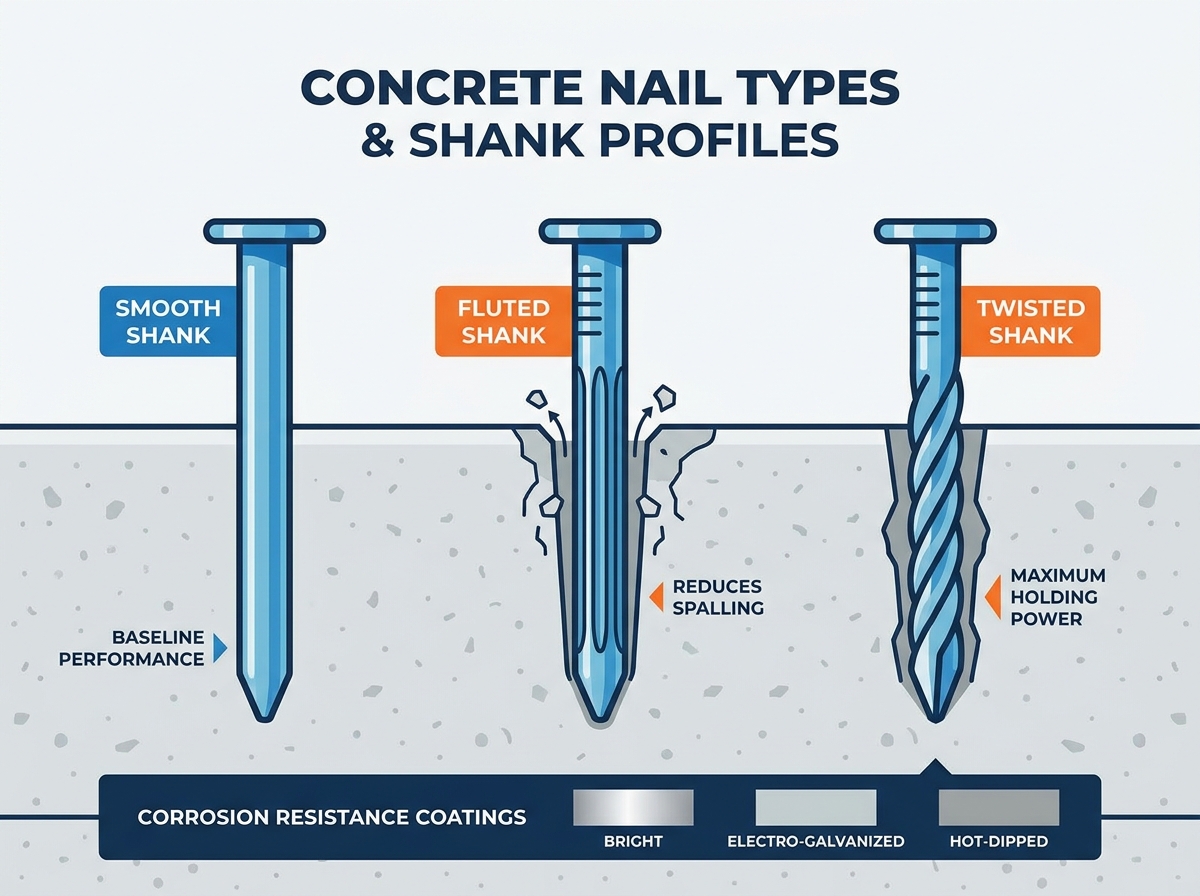
Selecting the right shank profile and protective coating ensures long-term stability. The physical shape of the pin dictates how it interacts with the substrate. The coating determines how long it survives environmental exposure.
Manufacturers engineer different shank profiles to solve specific masonry challenges. You must match the profile to your substrate hardness.
Unprotected steel rusts rapidly when exposed to moisture. Concrete naturally absorbs and retains ambient humidity. You must select the proper coating to prevent fastener degradation.
Bright or untreated pins suit indoor, climate-controlled dry applications only. Do not use them in basements or garages. Electro-galvanized options offer minimal zinc protection. They work for temporary holds or mild indoor humidity. Hot-dipped galvanized coatings provide thick, durable zinc barriers. You must evaluate moisture exposure limits rigorously. Hot-dipped options remain a mandatory decision for exterior Concrete nails home improvement projects exposed to weather.
Length dictates holding power and installation success. You must use the standard penetration depth framework. Add the exact thickness of your attached material to the required concrete embedment. Optimal embedment ranges strictly from 1 inch to 1.25 inches. Going deeper increases the risk of blowing out the substrate. It also raises the chance of the pin snapping during entry.
Gauge balances holding power against cracking risks. Thicker gauges provide higher shear capacity for heavy materials. However, they also increase displacement stress within the concrete. Driving a thick pin near an edge will fracture the slab. Thinner gauges penetrate easier but hold less weight. You must find the correct balance for your specific application.
Below is a standard size mapping chart. It translates Penny size (d) to practical measurements. Structural engineers must consult specific manufacturer ICC-ES evaluation reports for commercial load data.
| Penny Size (d) | Length (Inches) | Length (Millimeters) | Typical Application |
|---|---|---|---|
| 4d | 1 ½" | 38 mm | Furring strips to soft mortar |
| 6d | 2" | 51 mm | Plywood to green concrete |
| 8d | 2 ½" | 63 mm | Standard 2x4 sill plates |
| 10d | 3" | 76 mm | Thick lumber framing |
| 16d | 3 ½" | 89 mm | Heavy duty timber attachment |
Installation methods drastically impact project speed and operator fatigue. You must choose between manual striking and mechanized driving systems based on volume.
Hand-driven manual hammering works well for minor tasks. Use a heavy masonry hammer for these jobs. Standard claw hammers lack the mass to drive pins effectively. Striking a hardened pin improperly can cause it to ricochet. Manual installation suits small-scale masonry repairs or securing lightweight furring strips to soft brick. It offers slow speeds but requires no expensive equipment.
Mechanized options dominate larger commercial and residential jobs. Powder-Actuated Tools (PAT) deliver extreme velocity. They use small explosive charges to drive pins instantly. They handle cured, high-PSI concrete and steel-to-concrete connections flawlessly. Gas and battery pneumatic trackers offer lower velocity but higher convenience. They suit softer masonry or green concrete perfectly. They eliminate the need for powder load licensing.
Choosing a reliable Concrete nail gun requires matching collation types exactly. Manufacturers bind pins together using plastic strips or wire welds. Some specialized tools use a single pin paired with a metal washer. You must explicitly select compatible Concrete nails for nail gun magazines. Match the collation angle to your specific tool. Using the wrong angle guarantees frequent jams and potential tool damage.
Wood-to-concrete connections demand strict adherence to local building codes. Securing sill plates and basement framing requires heavy-duty fasteners. We highly recommend properly sized Concrete nails for framing to anchor base plates securely. The wood must sit flush against the slab before driving the fastener. Any gap allows the pin to bend under lateral loads.
Edge distance rules prevent structural blowouts. Never place fasteners too close to a concrete edge. The driving force creates a stress cone inside the material. Maintain a minimum distance of three inches from any unsupported edge. Space multiple fasteners adequately to avoid overlapping stress cones. A general rule dictates spacing pins at least ten times their shank diameter apart.
Sometimes, direct fastening fails completely. You must abandon nailing if the concrete approaches extreme hardness. Switch to pre-drilled masonry screws like Tapcons or expansion wedge anchors. They handle critical loads near edges much better. Pre-drilling removes material, eliminating displacement stress. This prevents old, brittle slabs from cracking during framing.
Job site safety remains paramount when fastening masonry. Hardened steel fasteners can ricochet aggressively if they strike rebar or aggregate. They can also shatter upon impact. Always wear ANSI-rated eye protection and thick leather gloves. Operators using powder-actuated tools must wear proper hearing protection. Treat every mechanized fastening tool with the same respect as a loaded firearm.
Selecting the right fastener involves following a clear, logical decision tree. You cannot guess your way to structural stability. Identify your base material hardness first. Determine your exact load and embedment depth requirements next. Finally, choose the correct shank profile and anti-corrosion coating.
Match your selected hardware with an appropriate installation tool. Do not guess your load requirements or substrate capabilities. We strongly advise consulting specific manufacturer load charts for commercial structural projects. Proceed with localized pilot testing for residential tasks. This simple test confirms substrate compatibility and holding power before full deployment.
A: No. Standard framing nails consist of mild steel. They will instantly bend, blunt, or snap when driven into rigid masonry. You must use specialized high-carbon steel fasteners specifically hardened for concrete penetration.
A: The industry standard dictates an embedment depth between 1 inch and 1.25 inches. Shallower penetration compromises holding power and shear strength. Deeper penetration dramatically increases the risk of substrate cracking or fastener failure.
A: Yes. You should use a heavy masonry hammer or a short hand sledge. Standard lightweight claw hammers lack the necessary mass. They often bounce off the hardened pin head, increasing the risk of dangerous ricochets.
A: Fluted pins feature straight, vertical grooves. These allow concrete dust to escape during driving, which reduces spalling. Spiral pins feature twisted shanks that rotate into the material. Spirals provide superior resistance to pull-out forces and dynamic loads.
A: No. Standard wood framing nailers lack the driving force required for masonry. They also use incompatible magazines. You must use a dedicated high-pressure pneumatic tracker or a powder-actuated tool designed specifically for masonry pins.


