
Views: 0 Author: Site Editor Publish Time: 2026-08-09 Origin: Site
Fastening wood or metal to masonry often causes immense frustration for builders. You might frequently encounter bent fasteners, shattered concrete substrates, and compromised structural integrity. These unexpected failures halt project momentum and destroy expensive materials. Nailing into concrete demands matching the fastener’s metallurgy to the substrate’s specific compressive strength (PSI). The delivery method must also align perfectly with the material density. Relying on standard hardware typically guarantees a failed, loose connection.
We will systematically diagnose the root causes of common fastening failures across various building environments. You will discover a practical framework for selecting the right Concrete Nail for your specific application. We will guide you through choosing the best installation method and finding the correct automated tool. Applying these steps ensures secure, code-compliant holds for your toughest construction or remodeling projects.
Fastening failures carry immense hidden costs for any business or project. Rework drains labor budgets quickly. Damaged materials increase site waste. Compromised load-bearing capacities pose severe safety hazards for future occupants. When a connection fails, you lose valuable project time troubleshooting the error. Understanding the underlying physics prevents these structural breakdowns.
You must respect the stark contrast between concrete density and steel hardness. High-PSI concrete contains incredibly hard aggregate rock and sand. Standard framing nails feature low-carbon steel designs. A standard nail will easily deflect, bend, or crumple upon impact against masonry. You need specialized, hardened steel fasteners to penetrate this dense matrix successfully. Manufacturers heat-treat these specialized fasteners to withstand extreme blunt force. The carbon content dictates the hardware's ultimate yield strength.
Curing time heavily influences your success rates on the job site. Substrate conditions change drastically over a single month. Driving fasteners into green concrete—poured less than 28 days ago—is generally easier. The chemical hydration process remains incomplete. The matrix stays somewhat pliable during this window. Fully cured concrete presents a much tougher, unyielding barrier. This aged material requires higher-velocity tools and stronger metallurgy to penetrate without cracking. Your fastener selection must adapt directly to these specific substrate conditions.
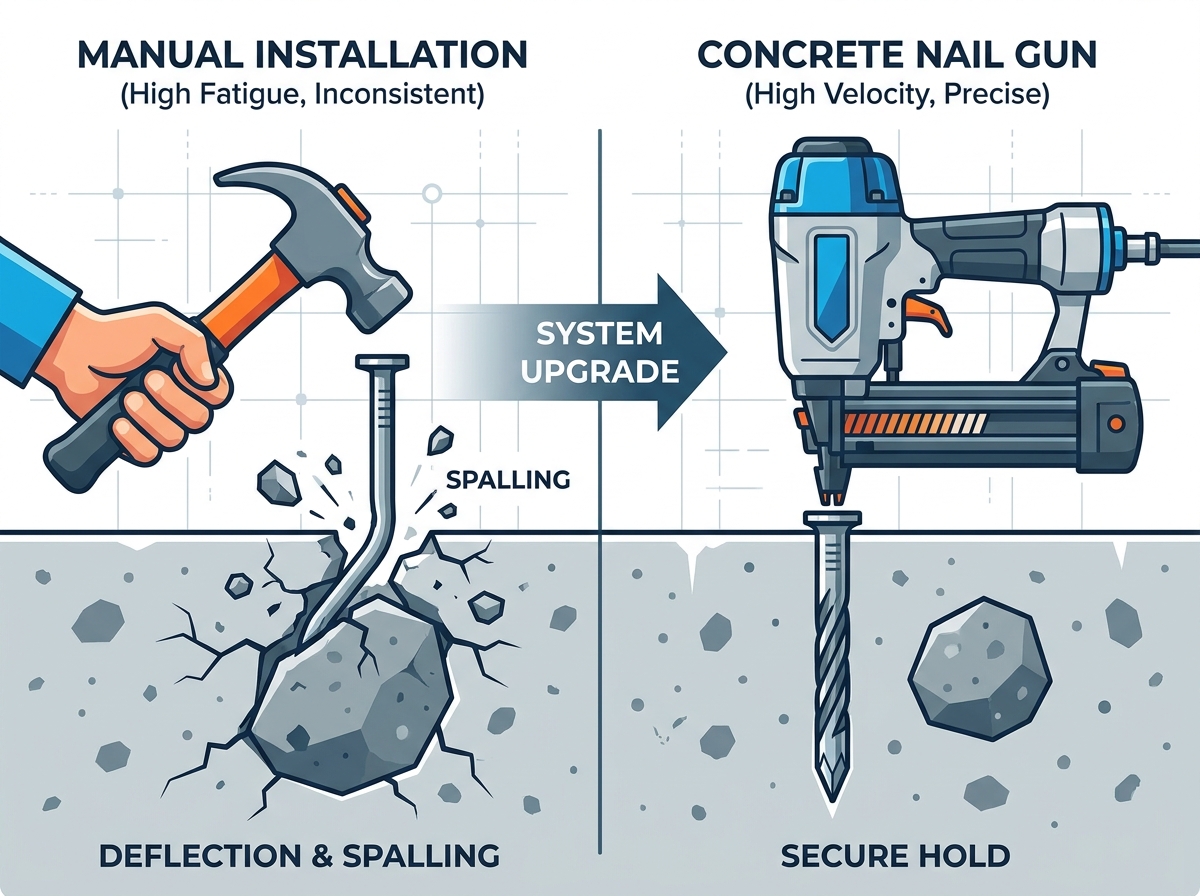
Builders frequently face three primary failure modes when attaching materials to masonry. You can eliminate these issues by understanding their mechanical root causes.
Bent hardware represents the most common frustration on the job site. The kinetic energy from your hammer strike has nowhere to go. It travels back up the shank, folding the metal.
Root Cause: You might be using an incorrect strike angle. Insufficient fastener hardness also plays a major role. Hitting hidden rebar or particularly dense river rock aggregate instantly stops forward momentum.
Solution: You should upgrade immediately to high-carbon, heat-treated masonry nails. Shift your strategy to shorter, thicker-gauge fasteners. A shorter shank reduces the leverage applied during an off-axis strike. Strike the head dead-center using a heavy club hammer instead of a lightweight framing hammer.
Spalling occurs when chunks of the masonry surface explode outward. This leaves an ugly crater and destroys all holding power.
Root Cause: The hardware displaces too much volume inside a highly brittle material. The substrate lacks the tensile strength to absorb the expansion. Fastening too close to an unsupported edge also triggers catastrophic blowouts.
Solution: Use fluted or spiral shank nails. These designs carve a path and allow concrete dust to escape. They relieve internal pressure rather than purely wedging the material apart. You must strictly enforce a minimum 3-inch edge distance rule when placing fasteners.
Sometimes the hardware drives in perfectly, but the attached material remains loose. The connection easily pulls away by hand.
Root Cause: Over-penetration is the primary culprit here. Driving the head too deeply pulverizes the concrete around the shank. Spalled pilot holes or heavy settling vibrations also destroy the friction fit.
Solution: Implement strict depth guidelines for your crew. Ensure a maximum penetration of 1 inch to 1-1/4 inches into the masonry itself. Stop striking the moment the attached material sits flush against the substrate.
Common Fastening Failure Diagnostic Matrix
| Failure Mode | Primary Root Cause | Immediate Actionable Solution |
|---|---|---|
| Shank Bending | Low steel hardness or striking dense aggregate | Switch to thicker, heat-treated masonry fasteners |
| Surface Spalling | Excessive internal pressure or edge proximity | Use fluted designs and maintain 3-inch edge clearance |
| Loose Connection | Over-penetration destroying the friction fit | Limit substrate penetration to 1-1/4 inches maximum |
Evaluating when to transition from hand-driving to automated systems depends on your project scale. Labor costs and physical fatigue quickly justify upgrading your equipment.
Manual Hammering
Swinging a heavy hammer provides a low barrier to entry. This approach remains highly cost-effective for small Concrete nails home improvement tasks. You might use manual methods for tacking down carpet strips or securing small furring strips in a basement. However, manual installation carries significant risks. High user fatigue sets in rapidly. Tired arms lead to inconsistent strike angles. This inconsistency ultimately guarantees high failure rates and wasted materials.
Powder-Actuated & Gas/Battery Nailers
Investing in a dedicated Concrete nail gun transforms productivity. These automated systems utilize extreme velocity. They drive the fastener inward before the surrounding masonry has time to crack. This speed is essential for commercial scalability and large residential builds.
When evaluating these tools, you must consider tool weight and maintenance overhead. Powder-actuated tools require regular cleaning to remove carbon buildup. They also mandate strict compliance and operator licensing requirements. Gas and battery-powered options offer easier maintenance but may lack the raw power needed for 50-year-old cured slabs.
You must heed one critical caveat when upgrading. You must strictly adhere to proprietary Concrete nails for nail gun systems. Mixing and matching different brands of hardware and magazines will cause dangerous jams. It also leads to frequent misfires and invalidates tool warranties.
Choosing the correct hardware requires aligning physical features with your desired project outcomes. The wrong shape or size guarantees poor holding power.
Key Evaluation Dimensions
The profile of the metal shank heavily dictates performance. We categorize these profiles into three distinct types:
Sizing logic requires careful calculation. You must consider the attached material thickness plus the required embedment depth. Follow these rules:
Application Focus
Selecting reliable Concrete nails for framing demands specific attention to corrosion resistance. Your main success criteria involve securing treated sill plates to newly poured slab foundations. Treated lumber contains highly corrosive copper chemicals. These chemicals will rapidly eat away raw steel in damp environments.
We recommend sourcing heavier gauge hardware for this application. Look for shank diameters between .145" and .157". You must ensure the hardware is hot-dipped galvanized or mechanically galvanized. This heavy zinc coating resists corrosion from treated lumber, ensuring the structural integrity of your walls lasts for decades.
Shank Profile Comparison Chart
| Shank Profile | Driving Difficulty | Pull-Out Resistance | Best Application Use Case |
|---|---|---|---|
| Smooth | Low | Low | Temporary fixtures, lightweight tracking |
| Fluted | Medium | High | General masonry, reducing surface spalling |
| Spiral | High | Maximum | Permanent heavy-duty framing attachments |
Working with masonry always involves high kinetic energy and unpredictable materials. Prioritizing safety and compliance protects your crew and your liability.
Risk mitigation requires proactive planning. The reality of spalling means high-velocity masonry shards are a constant job site threat. When a blow misses or hits hard aggregate, chips explode outward like shrapnel. Standardized Personal Protective Equipment (PPE) is strictly non-negotiable. You must wear ANSI Z87.1 certified eye protection. Heavy-duty hearing protection is also mandatory, especially when using powder-actuated systems in enclosed basements.
Compliance-aware thinking prevents costly code violations. You must constantly verify local building codes regarding structural shear wall base-plate fastening. Some municipalities restrict driven hardware in seismic zones. The local code may dictate the use of heavy-duty wedge anchors or epoxy systems instead of driven hardware for high-shear applications. Always check with your local inspector before framing a load-bearing wall.
Substrate verification saves immense frustration. We highly recommend running a simple center punch test. Hit a standard piece of hardware against the slab using moderate force. If it bends instantly, the slab is incredibly hard. This tells you to skip manual driving entirely and rent an automated tool. Gauging hardness before committing to a specific hardware purchase order prevents wasted money and delayed schedules.
Successfully completing masonry fastening requires matching your tool and hardware to the specific density of the substrate. You must also account for the precise load requirements of the attachment. Guesswork inevitably leads to structural failure and wasted materials.
Follow a simple shortlisting logic. For minor residential repairs, hardened fluted hardware and a heavy drilling hammer usually suffice. For framing a basement or tackling commercial jobs, manual driving becomes a liability. Investing in a dedicated automated tool and factory-matched hardware represents the only truly scalable path.
Actionable Next Steps:
A: It is highly difficult without severely damaging the surrounding concrete. They are designed for permanent installation. Removal usually requires grinding the head off or prying it out, which will cause a blowout crater.
A: Not for standard masonry nails or when using a nail gun. However, for extremely brittle concrete or when working near an edge, pre-drilling a pilot hole (smaller than the nail gauge) can prevent cracking.
A: The concrete's aggregate is harder than the steel. You must use specialized, heat-treated masonry nails. If using the correct nail, you may be using too light of a hammer (use a 2-3 lb club hammer) or striking off-axis.
A: Industry standard dictates 1 inch to 1-1/4 inches of penetration into the concrete itself, regardless of the thickness of the material being attached. Over-penetration increases the risk of the nail shearing.


