
Views: 0 Author: Site Editor Publish Time: 2026-07-31 Origin: Site
Fastener failure carries severe financial and reputational risks for modern roofing contractors. Shingle blow-offs and voided manufacturer warranties often trace back directly to improper nail selection. Using the wrong fastener can compromise an entire roofing system overnight. The construction industry has largely shifted toward pneumatic installation for asphalt shingles. Selecting the right coil nail represents a critical path for ensuring both operational efficiency and strict code compliance. Contractors need fasteners capable of handling rigorous environmental demands without sacrificing speed on the roof deck. This comprehensive guide evaluates key material specifications, sizing requirements, and critical installation tolerances. You will learn how to specify the correct fasteners to keep roofing systems secure and fully warrantied. We explore actionable insights to help buyers, project managers, and installers make highly informed, code-compliant purchasing decisions.
Labor dynamics in the roofing industry demand maximum productivity. Transitioning from traditional bulk hand-nailing to pneumatic nailers fundamentally changes job site economics. Hand-nailing requires repetitive motion. It slows down crews and increases physical fatigue. Pneumatic tools allow a skilled roofer to drive hundreds of fasteners in a fraction of the time. You can measure this operational efficiency directly in reduced labor hours per square. Faster cycle times translate into quicker project completions. This allows roofing companies to scale their operations and take on more jobs during peak building seasons.
Collated wire-welded coils deliver superior consistency compared to loose fasteners. Loose nails inevitably spill across steep roof pitches. They fall into gutters or disappear into surrounding landscaping. This generates unnecessary material waste and poses a hazard to property owners. Machine-collated rolls keep every fastener secure until the moment of impact. You eliminate the frustration of dropped nails. Crews experience a higher yield per box. The job site remains cleaner, requiring less sweep-up time at the end of the day.
Machine-driven fasteners offer exceptional reliability when properly utilized. Modern collation manufacturing relies on precise wire-welding techniques. This structural rigidity within the coil prevents nails from bending before they enter the driving channel. Properly maintained pneumatic tools rarely jam. You achieve aggressive, consistent holding power across the entire roof deck. This mechanical reliability keeps installers moving seamlessly from the starter strip straight up to the ridge cap.
Every building environment presents unique atmospheric challenges. Understanding the exact specifications for Coil nails roofing systems require ensures your installations pass inspection. You must match the fastener material, size, and shank profile to the specific demands of the project.
Fasteners face constant exposure to temperature swings, condensation, and atmospheric moisture. The protective coating you select determines the lifespan of the roof. Electro-galvanized (EG) fasteners represent the standard for basic inland applications. Manufacturers create EG nails by applying a thin layer of zinc via electrical currents. They remain highly cost-effective. However, they offer a thinner protective barrier. You should only specify EG fasteners in dry climates where moisture exposure remains relatively low.
Hot-Dipped Galvanized (HDG) fasteners provide superior longevity in demanding climates. The manufacturing process submerges the steel directly into molten zinc. This creates a much thicker, irregular protective coating. HDG fasteners resist premature rust aggressively. Many regional building codes mandate them for standard asphalt shingle installations. They protect the structural integrity of the roof deck against trapped moisture and heavy seasonal precipitation.
Stainless steel serves as the strictest standard for coastal environments. Salt-spray corrosion destroys galvanized coatings rapidly. Fastener failure near the ocean leads to catastrophic shingle loss. Stainless steel eliminates this vulnerability entirely. The initial cost-to-lifespan ratio skews higher. However, investing in stainless steel prevents premature roof failure and protects installers from severe liability claims in hurricane zones.
Industry regulatory bodies like ARMA (Asphalt Roofing Manufacturers Association) establish strict baseline metrics for roofing fasteners. They mandate a minimum 3/8-inch head diameter. This broad head provides the necessary surface area to hold the shingle firmly against the deck during high winds.
Selecting appropriate Coil nail sizes requires analyzing the specific roofing application. You can use 1-inch lengths for standard new applications involving traditional 3-tab shingles over bare decking. Architectural shingles feature thicker, multi-layered profiles. They demand 1 ¼-inch fasteners to ensure adequate penetration. When performing a tear-off or a recover over existing materials, installers must step up to 1 ½-inch or 1 ¾-inch lengths.
A strict rule of thumb governs depth compliance. Nails must penetrate at least 3/4 inch directly into the solid wood roof deck. If the existing deck utilizes thinner OSB or plywood, the fastener must pass completely through the sheathing. Failing to meet this penetration metric immediately voids the wind warranty.
The shank dictates how fiercely the fastener grips the underlying wood fibers. Smooth shank profiles serve as the industry baseline for standard asphalt shingles. They drive quickly and easily. You will find them sufficient for basic residential applications located in low-wind zones.
Ring shank profiles feature a series of distinct ridges running down the metal wire. These rings act like tiny wedges. They separate the wood fibers upon entry and lock them into place. You must evaluate this increased pull-out resistance for complex jobs. Ring shanks provide an essential upgrade for high-wind geographic areas. They also perform better when penetrating specialized synthetic underlayments.
| Shank Profile | Primary Advantage | Ideal Wind Zone | Installation Effort |
|---|---|---|---|
| Smooth Shank | Highly economical; fast driving speed | Low to Moderate Wind | Low resistance |
| Ring Shank | Maximum pull-out resistance; prevents backing out | High Wind / Hurricane Zones | Moderate resistance |
Accurate material estimation prevents job site delays. Running out of fasteners midway through a project wastes valuable daylight hours. You must rely on predictable consumption models rather than guesswork.
The baseline formula relies on calculating coverage per standard roofing square. One roofing square equals exactly 100 square feet of deck surface. Manufacturers typically package architectural shingles in sets of three bundles per square. You use this fundamental measurement to build your entire material order.
Standard application patterns utilize a traditional 4-nail layout per shingle. You drive these fasteners straight across the designated nailing strip. This conventional layout yields a requirement of approximately 320 nails per roofing square. It satisfies basic warranty requirements for standard inland climates.
High-wind applications demand a tighter grid. Enhanced manufacturer warranties in hurricane-prone zones require a strict 6-nail pattern. Installers place two extra fasteners near the inner edges of the shingle. This aggressive anchoring strategy adjusts the consumption model significantly. You will need approximately 480 nails per square to meet compliance.
No mathematical model survives the reality of a messy job site without a waste factor allocation. Recommend a standard 5% to 10% inventory buffer. Installers drop nails. Compressors misfire. Furthermore, starter strips and ridge cap installations consume extra fasteners rapidly. Building this buffer into the initial purchase order prevents costly mid-day trips to the supply house.
Specifying the perfect fastener means nothing if the crew installs it incorrectly. Pneumatic tools require constant supervision. Mechanical errors during the fastening process compromise the entire building envelope immediately.
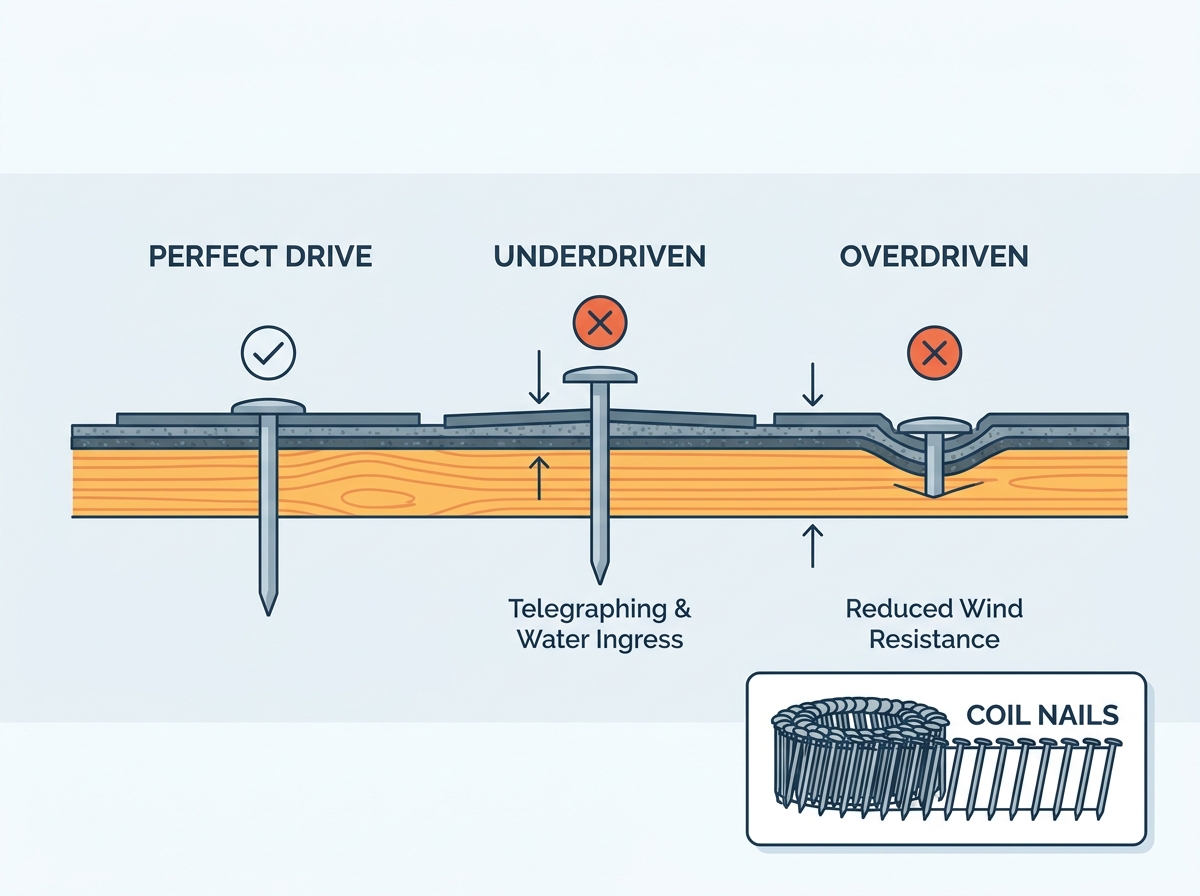
The anatomy of a perfect drive requires absolute flush installation. The flat head of the fastener must sit perfectly level against the shingle. It should compress the material slightly without cutting into the delicate asphalt mat. This flush seating ensures maximum holding power. It prevents the wind from catching the edge of the overlying shingle.
You must train crews to avoid several critical failures. These errors cause immediate damage and invite long-term structural decay:
Tool calibration solves most installation errors. Highlight the absolute necessity of regulating compressor pressure. A baseline of 90 to 110 PSI generally provides a steady drive. However, conditions change. You must adjust the nail gun’s depth-of-drive dial throughout the day. Morning installations involve cold, rigid asphalt. Afternoon sun transforms the shingles into a highly pliable material. Installers must recalibrate their tools to match the changing physical properties of the shingles.
Procuring materials requires rigorous vendor evaluation. Do not treat fasteners as a generic commodity. Assess your suppliers based on established industry metrics. Request International Code Council Evaluation Service (ICC-ES) compliance reporting for all imported materials. Examine the collation quality closely. Poorly welded wires cause flagging, where metal shards stick out and jam the pneumatic driver blade. Verify bulk shipping reliability to ensure pallets arrive on site exactly when the framing crew finishes the roof deck.
Matching your specifications directly to manufacturer warranties protects your business. Buying the absolute cheapest imported box can invalidate a premium 50-year shingle warranty. Major brands like GAF, IKO, and Owens Corning publish highly specific fastener requirements. Strict adherence to their published technical documentation is required. If a catastrophic wind event occurs, insurance adjusters will inspect the fasteners first. They will deny claims if the materials fail to meet published specifications.
Take an actionable next step today. Prompt your project managers to audit current local code requirements before they submit the next bulk material order. Pay special attention to shifting municipal wind ratings. Verify deck thicknesses on upcoming projects. Aligning your procurement strategy with localized building codes eliminates costly re-inspections and secures your reputation for quality craftsmanship.
Specifying the proper fasteners for asphalt shingles remains a critical engineering decision. You must carefully balance material coatings, physical sizes, and application patterns against regional environmental stress. A highly durable roof relies entirely on the tiny metal components holding it together. Smooth shanks may work inland, but rigorous coastal environments demand stainless steel precision.
Proper fastener selection actively protects the roofing contractor's professional liability. It simultaneously secures the property owner's financial investment against severe weather events. Precision during the procurement phase eliminates devastating failures on the job site.
We encourage you to leverage these technical insights for your next major project. Take time to view a specific product catalog detailing exact shank profiles. Contact a dedicated sales representative to negotiate reliable bulk pricing for your upcoming season. Download a standardized fastener calculation cheat sheet to streamline your estimation process.
A: Standard 1-inch lengths rarely provide enough depth for architectural shingles. Because architectural shingles feature a thicker, multi-layered profile, they require deeper penetration. You should recommend 1 ¼-inch lengths for standard architectural applications to ensure you hit the wood deck properly.
A: Wire-weld collation serves as the strict industry standard for 15-degree roofing nailers. The welded metal wire provides essential structural rigidity within the coil. This prevents bending and jamming. Plastic collation is typically reserved for siding or framing applications, not asphalt shingle installation.
A: Yes. Building codes dictate strict penetration rules. If the roof deck uses standard OSB or plywood (typically thinner than 3/4 inch), the fastener must penetrate completely through the underside of the decking to secure maximum holding power.
A: Electro-galvanized (EG) nails eventually rust if subjected to constant moisture. They feature a thin layer of protective zinc. While suitable for dry inland environments, they will corrode rapidly in high-moisture, humid, or coastal areas. Hot-dipped galvanized or stainless steel options last much longer.


