
Views: 0 Author: Site Editor Publish Time: 2026-07-26 Origin: Site
Every woodworking project presents a critical dilemma. Using the wrong fastener often leads to ruined, split trim. Conversely, selecting an inadequate fastener results in weak joints pulling apart over time. Both options serve as essential pneumatic or cordless fastening solutions in modern workshops. However, their distinct gauge differences dictate entirely different applications. You cannot simply swap them out and expect professional results. Matching the fastener size to your material mass prevents costly rework. This guide provides a strictly technical and practical breakdown. We will help you choose the right fastener for your specific trim, cabinetry, or furniture project. You will learn the exact gauge rules and tooling strategies required. This ensures your next build stays secure and looks flawless.
Understanding the core differences starts by defining the wire gauge system. It seems counter-intuitive to beginners. A higher gauge number means a thinner fastener. Conversely, a lower gauge number indicates a thicker, stronger wire. We evaluate material specs to prevent project failure. You must match the wire thickness to the density of your wood.
Let us examine the 18-gauge fastener first. It serves as a standard baseline across the industry. You will find various Brad nails sizes available at any hardware supplier. They cater to different material depths. Common Brad nail lengths range from 5/8 inch to 2 inches. Manufacturers design them specifically for delicate work. They feature a minimal head profile. The gun drives them flush or slightly below the surface. This happens without heavy impact. It leaves a tiny hole. You barely see the entry point. This saves you significant time during the finishing phase.
Next, we examine the heavier alternatives. These are 15-gauge and 16-gauge options. They range from 1 inch to 3 inches long. They feature a pronounced head design. This provides maximum shear strength. You get incredible holding power. They secure heavy materials firmly. The thicker shaft resists bending. You can drive them into dense hardwoods effectively. They do not deflect easily when hitting wood grain.
| Feature | 18-Gauge (Brad) | 15/16-Gauge (Finish) |
|---|---|---|
| Wire Thickness | Thin (0.0475 inches) | Thick (0.0625 - 0.0720 inches) |
| Head Size | Minimal / Barely visible | Pronounced / Distinct "T" or "D" shape |
| Primary Strength | Split prevention | Shear strength & load bearing |
| Hole Size | Tiny (often paint-fillable) | Large (requires wood putty) |
We often ask, What are brad nails used for? The answer lies in specific success criteria. You choose them when aesthetic preservation matters most. They excel at split prevention. You prioritize these visual benefits over structural load-bearing capacity. Thin materials crack easily under pressure. The thin 18-gauge wire pierces the wood grain cleanly. It displaces very little wood fiber. This prevents catastrophic splits along the board.
Primary applications span across numerous finish carpentry tasks. Professional carpenters rely on them daily.
They act as an internal clamp. You use them while wood glue dries. The glue provides the actual structural strength. A standard brad nail simply holds the pieces perfectly aligned until the adhesive cures.
However, significant implementation risks exist. They fail in specific structural situations. You must avoid using them for heavy loads. Do not hang solid wood doors using them. Do not install thick MDF baseboards on uneven drywall. They will bend. They will pull through the material. The small head offers no resistance against pulling forces. The trim will eventually detach from the wall.
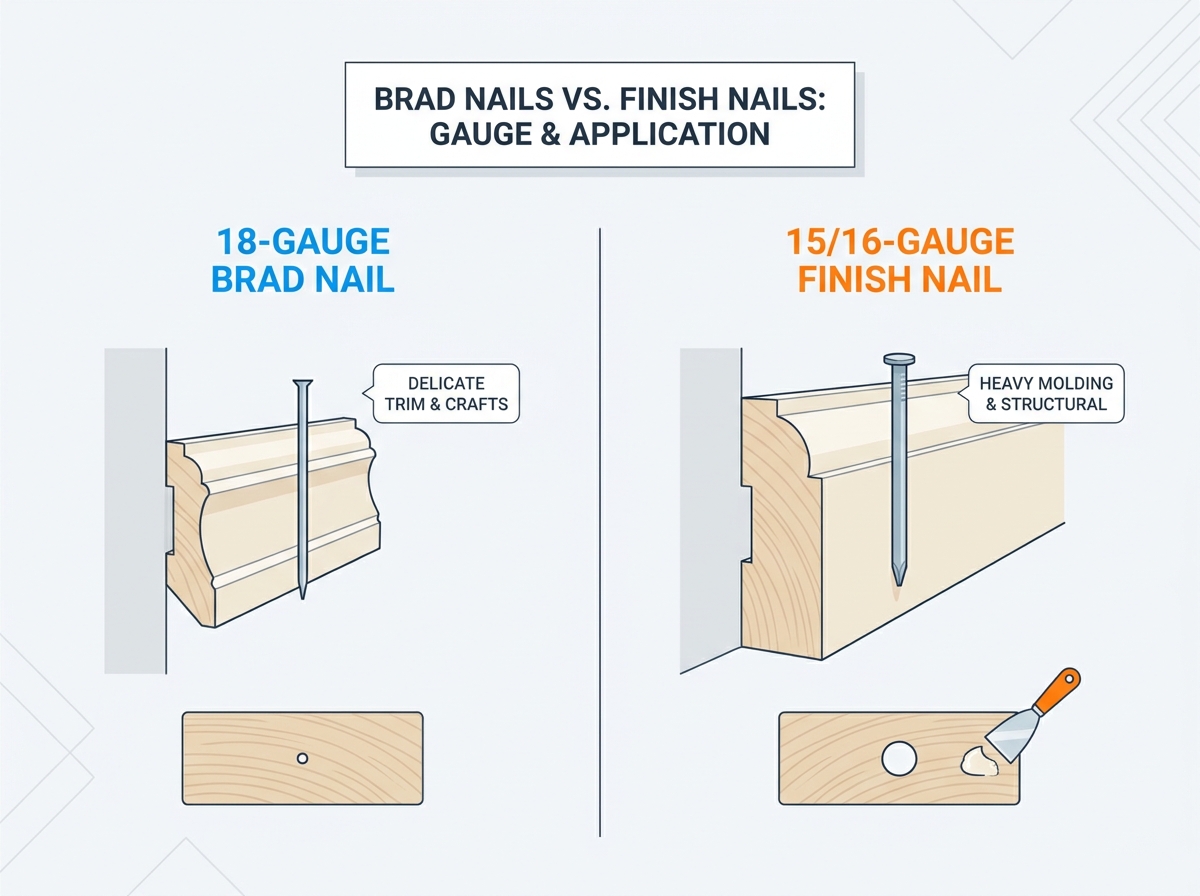
Sometimes you need maximum holding power. You must hold heavy, dense materials against a wall stud. You fight gravity and structural movement constantly. This forms your success criteria. The fastener alone must do the heavy lifting. You cannot rely on wood glue when attaching trim to painted drywall. The thicker wire provides the necessary rigidity. The larger head prevents the trim from slipping off the shaft.
Primary applications demand stronger fasteners. Professional builders know exactly when to upgrade.
You often use galvanized or stainless variants outside. These resist rust. They handle weather expansion and contraction. The thick shaft prevents the board from shifting over time.
There is a significant trade-off involved. They cause major adoption friction for quick projects. They leave visible holes in your wood surface. You must use wood putty to fill them. You must sand the surface smooth afterward. Finally, you paint or stain over the spot to conceal it completely. This adds hours to your project timeline. You accept this extra labor because structural integrity demands it.
We need a clear decision framework. We compare Brad nails vs finish nails alongside pin options. You base your choice on material thickness and wood type. Hardwoods act differently than softwoods. You must account for grain density.
A strict rule of thumb applies to all gauges. Match the fastener length carefully. It must be 2.5 to 3 times the thickness of the material being fastened. This ensures proper stud penetration. If you attach a 0.5-inch piece of trim, you need a 1.5-inch fastener. This embeds one inch deep into the wall stud. It guarantees a permanent hold.
You must choose between pneumatic and cordless battery models. This dictates your workflow. Pneumatic nailers require an air compressor investment. They utilize an air hose. They offer sustained, aggressive power. They weigh significantly less in your hand. This prevents arm strain during long projects. Cordless battery models cost more upfront. They offer unmatched convenience. You never trip over an air hose. You can move freely around the job site.
Expertise Note: Cordless 18-gauge nailers have a slight ramp-up time. The internal flywheel needs a fraction of a second to spin up. They feature a heavier body due to the battery. This causes fatigue during overhead crown molding installations. You feel the weight after an hour of reaching toward the ceiling.
We offer specific procurement advice for beginners. You should start with a versatile Brad nail kit. It contains an assortment of lengths in one box. You get 1-inch, 1.25-inch, 1.5-inch, and 2-inch options. You can test material compatibility safely. Always shoot a few test rounds on scrap wood. Check for splitting. Check for proper depth. You do this before committing to a final, expensive piece of oak trim. It prevents costly mistakes and wasted materials.
Summarizing the fastener debate is straightforward. There is no universally "better" nail on the market. There is only the correct fastener for your specific material mass. You choose the 18-gauge option to prevent splits in delicate trim. You choose the 15- or 16-gauge option to hold heavy architectural elements against gravity.
Take action before starting your next project. First, measure your thickest trim piece. Next, evaluate your need for structural hold versus an aesthetic finish. Finally, select the corresponding nailer gauge. Buy an assortment pack of fasteners. Test them on scrap wood. By following this technical framework, your trim will stay firmly attached and look professionally finished for decades.
A: Yes, you can use them for thin or lightweight MDF baseboards. They handle thin profiles well. However, 16-gauge finish nails are strictly recommended for heavy, solid wood baseboards. Heavy baseboards require more structural holding power.
A: Yes, they do have heads. However, they are significantly smaller than finish nail heads. Manufacturers design them this way deliberately. They sink cleanly into the wood. This leaves a tiny hole.
A: No. Nailers are entirely gauge-specific. An 18-gauge nailer cannot fire 16-gauge nails. A 16-gauge nailer cannot fire 18-gauge nails. The firing channel only fits one specific wire diameter.
A: It is often optional for basic paint-grade trim. The hole is incredibly tiny. High-quality paint can sometimes bridge the gap. However, we highly recommend using putty for a flawless, professional finish.


