
Views: 0 Author: Site Editor Publish Time: 2026-07-25 Origin: Site
Splitting a piece of delicate wood trim can instantly ruin a hard-earned woodworking project. Spending tedious hours filling massive holes also drains the joy out of basic home improvements. You need a better fastening strategy to save precious time and protect your materials. Choosing the correct fastener gauge matters immensely in finish carpentry. It dictates whether you achieve a seamless, professional finish or accidentally compromise your fragile stock. You want secure holds without leaving behind unsightly craters or splitting thin wood.
We will define the specific physical traits of a brad nail throughout this comprehensive guide. We will outline ideal applications and compare these fasteners against heavier alternatives. Finally, you will receive a straightforward framework for selecting accurate lengths for your specific pneumatic tools. Understanding these fundamentals elevates the overall quality of your work.
Understanding fastener construction helps you make better choices for your woodworking projects. The physical dimensions directly impact how the fastener interacts with different wood species.
Wire gauge standards strictly dictate fastener thickness. In wire manufacturing, a higher gauge number indicates a substantially thinner wire. The 18-gauge diameter measures approximately 0.0475 inches. This precise diameter acts as the universal industry standard for lightweight pneumatic tools. It strikes a highly effective balance. It easily penetrates hard oak without bending. It also holds securely in soft pine without tearing the fibers.
Examine the fastener closely under good lighting. The head profile remains incredibly minimal compared to standard framing supplies. Manufacturers design it this way on purpose. The small rectangular head countersinks cleanly beneath the wood surface upon impact. What is the final outcome? You drastically reduce your need for heavy wood filler. You also minimize post-installation sanding. This intelligent design saves significant labor hours on large trim jobs.
You will find multiple standard industry lengths available today. These typical Brad nails sizes usually range from 5/8-inch up to 2 inches. Manufacturers generally collate them in glued, straight strips. They align the wire precisely to feed smoothly through a magazine. These glued strips fit seamlessly into modern 18-gauge nail guns. You can use them in both traditional air-powered pneumatic tools and modern battery-powered cordless tools.
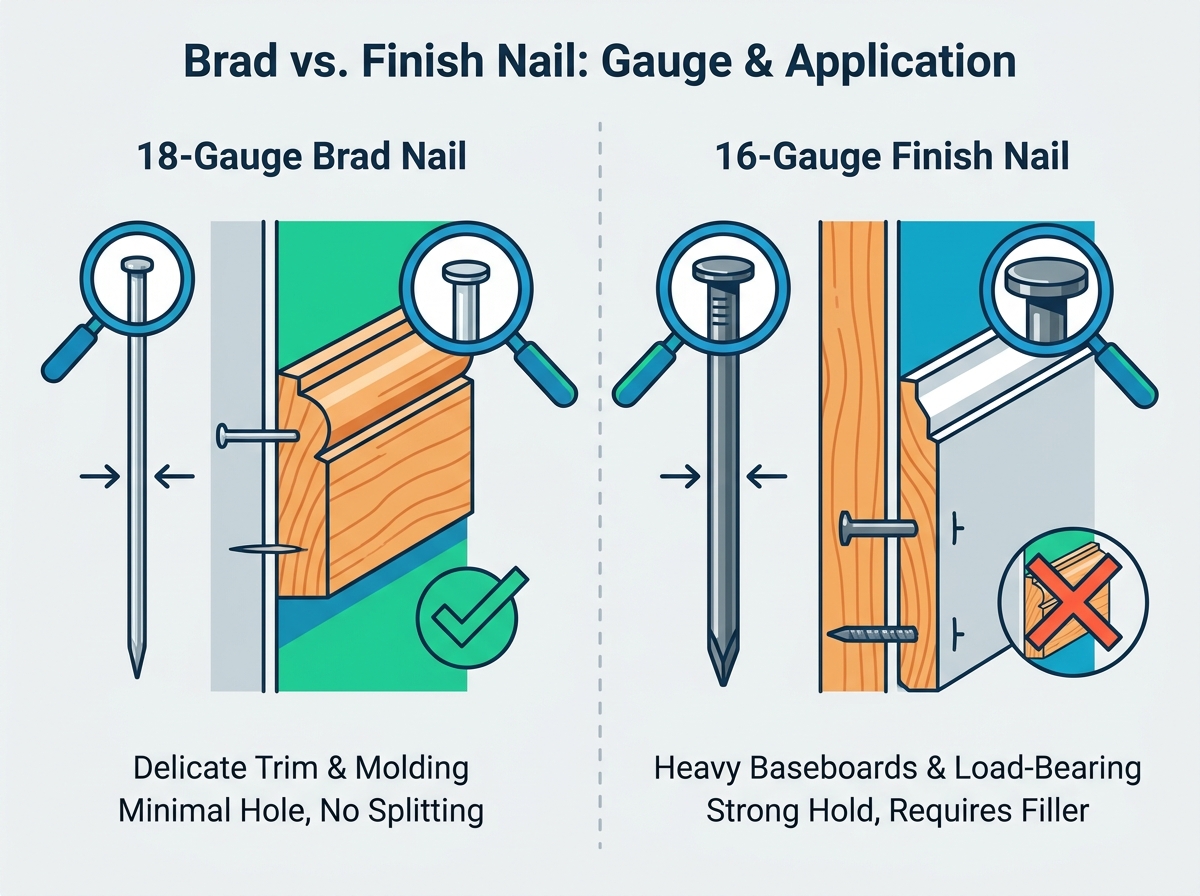
Many DIYers and novice carpenters frequently ask: What are brad nails used for during daily woodworking? The answers cover several highly specific finish carpentry tasks. They excel anywhere aesthetics matter more than structural strength.
You should primarily use them for delicate decorative tasks. Think of installing shoe molding, quarter round, cove molding, and narrow window casings. The thin 18-gauge wire prevents splitting in fragile, narrow profiles. MDF and thin pine pieces require this gentle approach. A thicker fastener would simply blast the delicate molding apart along the grain line.
Professional woodworkers rely on them heavily when building custom cabinets. They work beautifully for attaching thin plywood backings to shelving units. You can also use them to secure delicate trim elements onto cabinetry face frames. They hold parts firmly without damaging the expensive hardwood veneer.
Complex glue-ups can slide around easily under heavy clamping pressure. Wood glue acts like a lubricant before it sets. You can shoot a few 18-gauge fasteners to act as temporary clamps. They hold the assembly perfectly tight while the wood glue fully cures. Once the glue dries completely, the joint achieves its true long-lasting strength.
You must respect material limitations to ensure safety and durability. Never use them for heavy structural tasks. They completely lack necessary shear strength. Do not use them to install thick crown molding. Avoid using them for heavy baseboards. Never employ them for structural wall framing. They will simply bend or pull out under heavy loads.
Comparing Brad nails vs finish nails reveals distinctly different physical characteristics. You must understand their intended roles before starting any project. Using the wrong option leads to unnecessary repairs.
We already know the 18g standard. Finish fasteners utilize much thicker 15-gauge or 16-gauge wires. This thicker wire profile increases fastener rigidity significantly. It drives straighter through dense materials. The extra mass also resists bending when hitting knots in the wood.
Smaller 18g fasteners provide lower overall holding power. However, they leave a nearly invisible entry hole. They pose virtually zero splitting risk on thin stock. Conversely, thicker 15g or 16g variants offer incredibly high holding power. However, their larger heads require noticeable wood putty later. They also drastically increase the risk of splitting delicate wood ends.
You cannot mix and match these supplies. The 18-gauge strips and 16-gauge strips require entirely different nail guns. They are absolutely not interchangeable. The internal firing pins and magazine tracks differ completely. Attempting to swap them causes dangerous tool jams and ruins internal rubber seals.
Use the simple comparison chart below to choose the right fastener for common scenarios.
| Project Scenario | Best Choice | Primary Reason |
|---|---|---|
| Attaching 1/2-inch thick pine casing | 18-Gauge | Prevents splitting on narrow, soft material; minimal patching. |
| Attaching 3/4-inch thick hardwood baseboard | 16-Gauge or 15-Gauge | Requires high holding power to resist vacuum impacts and wall shifts. |
| Securing 1/4-inch plywood cabinet backing | 18-Gauge | Thin backing does not require structural shear strength. |
| Hanging solid wood interior doors | 15-Gauge | Needs maximum shear strength for heavy, load-bearing frames. |
Choosing proper Brad nail lengths ensures your trim stays permanently attached to the wall. Professional carpenters rely on a simple but highly effective calculation.
The fastener should measure two to three times longer than your attached material's thickness. Are you fastening a 1/2-inch piece of trim? You require a 1-inch or 1.25-inch fastener. This specific formula guarantees adequate penetration into the backing surface. It ensures the wire grabs enough solid wood fiber to hold securely over time.
Always evaluate your backing material limits before pulling the trigger. You must ensure the sharp point does not pass completely through your base structure. A 1.25-inch fastener shot through 1/2-inch trim and into a 3/4-inch cabinet wall might barely poke through the other side. This creates a dangerous and unsightly hazard on the interior of your cabinets.
Always adjust your length expectations based on specific wood species. Hardwoods like oak or maple grab smooth wire very securely. You might get away with slightly shorter lengths in these dense materials. Softwoods like pine or porous MDF require slightly deeper penetration. They need more surface area contact for an equivalent grip.
Should you buy individual boxes or a combined pack? Investing in a multi-size Brad nail kit makes practical sense for most users. It simplifies your storage and prepares you for unexpected tasks.
Buying single-size boxes costs more upfront. A multi-pack provides high value for DIYers and occasional woodworkers. You gain immediate flexibility for various trim thicknesses. You rarely need 1,000 fasteners of a single size for one small room remodel. An assortment pack keeps your toolbox lean and highly functional.
A reliable assortment typically covers the most common dimensions used in finish carpentry. Look for assortments containing 5/8", 1", 1-1/4", and 2" strips. This range lets you tackle everything from tiny craft projects to standard window casings.
Always perform brand-agnostic fit checks. Most standard 18-gauge strips fit popular nailers seamlessly.
Experience matters deeply when operating pneumatic fastening tools. You will encounter physical challenges on real-world job sites. Master these techniques to avoid ruined materials and frustrating rework.
Wood grain can deflect a thin 18-gauge wire easily. It pushes the wire out the side of your trim. Carpenters call this a "blowout." It ruins the visible surface instantly and requires pulling the wire out with pliers. How do we prevent it? Always align your tool perpendicular to the wood grain. Pay close attention to the chisel point orientation. The point should cut across the grain fibers. It should not act like a wedge between them.
You must properly calibrate your nailer before starting the real work. The head should sit just below the wood surface. This avoids "proud" heads sticking out. It also prevents excessively deep craters.
Avoid using low-quality or damaged strips. Weak glue causes the strips to fall apart inside the tool's magazine. This leads to immediate jams. Dropping a box of fasteners can also bend the strips slightly, rendering them useless. Always disconnect the air supply or battery before safely clearing any blockages. Never force the firing mechanism if it feels stuck.
To summarize, the 18-gauge fastener serves a highly specialized role in your workshop. Manufacturers design it for superior aesthetics and delicate materials. It does not provide significant structural support. We strongly advise matching your specific trim thickness to the proper fastener lengths. Do not guess on the sizes. Invest in a diverse multi-size assortment pack if you plan to tackle multi-room trim projects. This approach ensures maximum versatility without overspending.
For your next step, check your current nail gun's length specifications. Verify exactly what it can handle. You might also want to browse recommended 18-gauge nailer reviews to upgrade your existing toolkit. A high-quality tool paired with the correct fasteners makes any trim job smoother.
A: Technically yes, if you purchase them loose. However, their thin 18-gauge wire bends incredibly easily under a manual hammer strike. Manufacturers primarily design them in collated, glued strips specifically for pneumatic or cordless nailers. Using a nail gun ensures perfectly straight, flush drives without bending the delicate wire.
A: Pin nails utilize even thinner 23-gauge wire. They generally have no head at all. Woodworkers use pin nails for the most delicate veneers and tiny moldings. They usually require absolutely zero wood filler. However, pin nails offer significantly less holding power than 18-gauge fasteners.
A: No. Engineers design nail guns for specific wire gauges only. Using 18-gauge fasteners in a 16-gauge gun will cause severe jams. It can also cause permanent internal tool damage. The firing pin and magazine track dimensions differ too drastically to allow cross-compatibility.
A: Generally, no. Heavy baseboards require thicker 15- or 16-gauge finish fasteners. Thicker wire secures the heavy boards firmly to your wall studs. This robust holding power resists daily physical impacts from moving furniture, heavy vacuums, pets, or feet over time.


